Table of Contents
Secure SHell (SSH)
Password Based Authentication
- Go to your host machine.
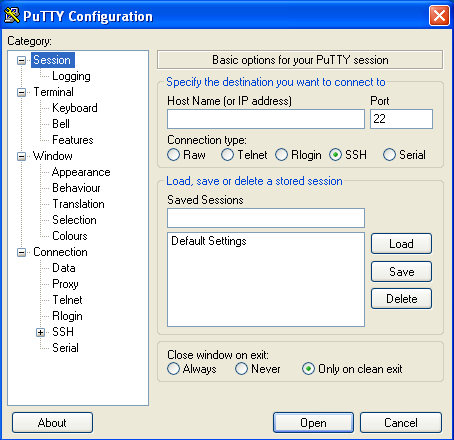
- Start PuTTY utility, by double-clicking on its .exe file.
- In the Host Name field, enter the IP address/Hostname of the ssh server
- Click open.
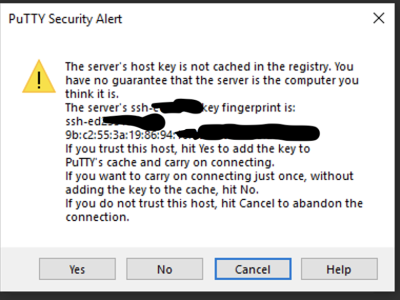
- When you are log in to a server for the first time putty will ask you to confirm crypto signature of the server. For the added security the signature by clicking Yes
- Then It will ask for username followed by password.
- logout to close this session.
Public Key Authentication
Generating OpenSSH-compatible Keys for Use with PuTTY
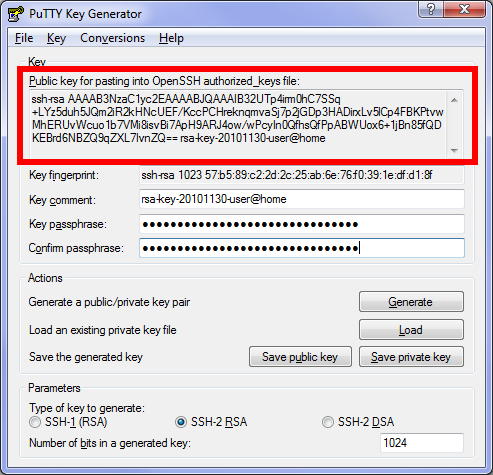
To generate a set of RSA keys with PuTTYgen
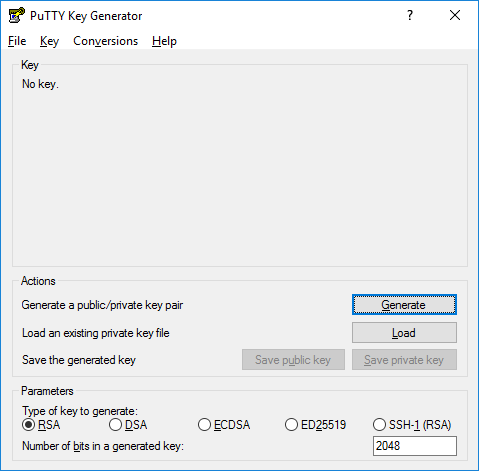
- Start the PuTTYgen utility, by double-clicking on its .exe file.
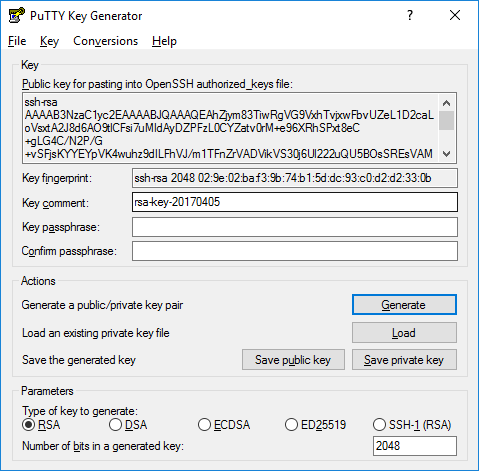
- For Type of key to generate, select RSA
- In the Number of bits in a generated key field, specify either 2048 or 4096 (increasing the bits makes it harder to crack the key by brute-force methods).
- Click the Generate button.
- Move your mouse pointer around in the blank area of the Key section, below the progress bar (to generate some randomness) until the progress bar is full.
- A private/ public key pair has now been generated.
- In the Key comment field, enter your email address.
- The Key passphrase field & re-type the same passphrase in the Confirm passphrase field.
- Click the Save private key button and save as private_key .
- Right-click in the text field labeled Public key for pasting into OpenSSH authorized_keys file and choose Select All.
- Right-click again in the same text field and choose Copy.
- Open notepad; paste the public key and save it as txt file.
Save The Public Key On The Server
Now, you need to paste the copied public key in the file ~/.ssh/authorized_keys on your server.
- Log in to your destination server using putty with your username
- If your SSH folder does not yet exist, create it manually
mkdir ~/.ssh
chmod 0700 ~/.ssh
touch ~/.ssh/authorized_keys
chmod 0644 ~/.ssh/authorized_keys
- Paste the SSH public key into your ~/.ssh/authorized_keys file:
sudo vi ~/.ssh/authorized_keys
- Tap the i key on your keyboard & right-click your mouse to paste.
- To save, tap the following keys on your keyboard (in this order): Esc, :wq Enter.
- Log out from the server.
Create a PuTTY Profile to Save Your Server’s Settings
In PuTTY, you can create (and save) profiles for connections to your various SSH servers, so you don't have to remember, and continually re-type redundant information.
- Start PuTTY by double-clicking its executable file.
- PuTTY's initial window is the Session Category (navigate PuTTY's various categories, along the left- hand side of the window).
- In the Host Name field, enter the IP address/Hostname of the ssh server
- Enter the port number in the Port field as 22
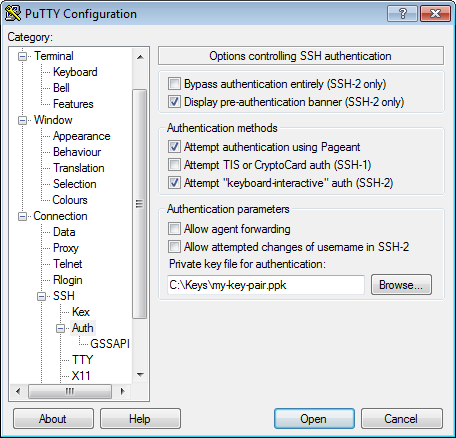
- Along the left-hand side of the window, select Connection > SSH > Auth
- Browse your file system and select your previously-created private key.
- Return to the Session Category and enter a name for this profile in the Saved Sessions field.
- Click the Save button for the Load, Save or Delete a stored session area.
Now you can go ahead and log in and you will not be prompted for a password. However, if you had set a passphrase on your public key, you will be asked to enter the passphrase at that time (and every time you log in, in the future).
Two Factor Authenticating
We will enable two-factor authentication in our ubuntu server. To implement that we are going to use multifactor authentication with Google Authenticator.
Google auhtenticator
- Install Google Authenticator from following the link in your mobile devices
https://support.google.com/accounts/answer/1066447?hl=en
- Follow the instruction and install the app on your mobile.
- Or you can search for google-authenticator in Google Play or Apple Store.
Create an Authentication Key
- Go to the Ubuntu VM
- Install google-authenticator module first:
sudo apt-get update
sudo apt-get install libpam-google-authenticator
- Log in as the user you’ll be logging in with remotely and run the google-authenticator command to create a secret key for that user.
$ google-authenticator

Do you want authentication tokens to be time-based (y/n) y
- You will get some QR code output like bellow:
If you can't see the full QR code in your putty screen, use the google url given, on your browser.
You will be prompted for some configurations.
- Scan the QRcode that appears with the Google Authenticator app or you can add the secret key Google Authenticator app.
- Save the backup codes listed somewhere safe. They will allow you to regain access if you lose your phone with the Authenticator app.
- Next it will ask several questions; unless you have a good reason to, Just enter “y” for them.
Do you want me to update your "/home/thilina/.google_authenticator" file? (y/n) y

Do you want to disallow multiple uses of the same authentication
token? This restricts you to one login about every 30s, but it increases
your chances to notice or even prevent man-in-the-middle attacks (y/n) y

By default, a new token is generated every 30 seconds by the mobile app.
In order to compensate for possible time-skew between the client and the server,
we allow an extra token before and after the current time. This allows for a
time skew of up to 30 seconds between authentication server and client. If you
experience problems with poor time synchronization, you can increase the window
from its default size of 3 permitted codes (one previous code, the current
code, the next code) to 17 permitted codes (the 8 previous codes, the current
code, and the 8 next codes). This will permit for a time skew of up to 4 minutes
between client and server.
Do you want to do so? (y/n) y

If the computer that you are logging into isn't hardened against brute-force
login attempts, you can enable rate-limiting for the authentication module.
By default, this limits attackers to no more than 3 login attempts every 30s.
Do you want to enable rate-limiting? (y/n) y
Enable two factor authentication for SSH
- Edit the /etc/pam.d/common-session file
sudo vi /etc/pam.d/common-session
- Add the following line at the end:
auth required pam_google_authenticator.so nullok
- :wq Save and quit.
- Edit /etc/ssh/sshd_config file
sudo vi /etc/ssh/sshd_config
- Search for ChallengeResponseAuthentication and replace no with yes
ChallengeResponseAuthentication yes
- Add following to the end.
AuthenticationMethods publickey,keyboard-interactive
- :wq Save and quit.
- Now you need to reload the ssh service. You can do it to way:
sudo service ssh restart
Login to the server
Try to ssh to the server from a new terminal. It will ask for the verification code.
Note: This tutorial was based on training content of APNIC, NSRC and SANOG

